Graphic Instructional Materials
Graphic Instructional Materials
Features Overview

HIERARCHY
of Needs
Portfolio Edition
This is a professional Framework I designed for students to give an ordered priority list when building their portfolios. Click below to download
Twine Features
Once you have complimented your narrative design, the assignment calls for a polish pass of new features in your twine game that will uplift your design and story. here are the features we reviews in class.

by throughing brackeys on a statement, you are giving it a kind of “meaning”. You are telling twine, hey, this is going to do something.
by then gicing the command of //(click:) and //(replace:) to the new variable you just made, in this case //say, you are telling it to change it!
Type in this command in the twine editor to see the magic yourself!

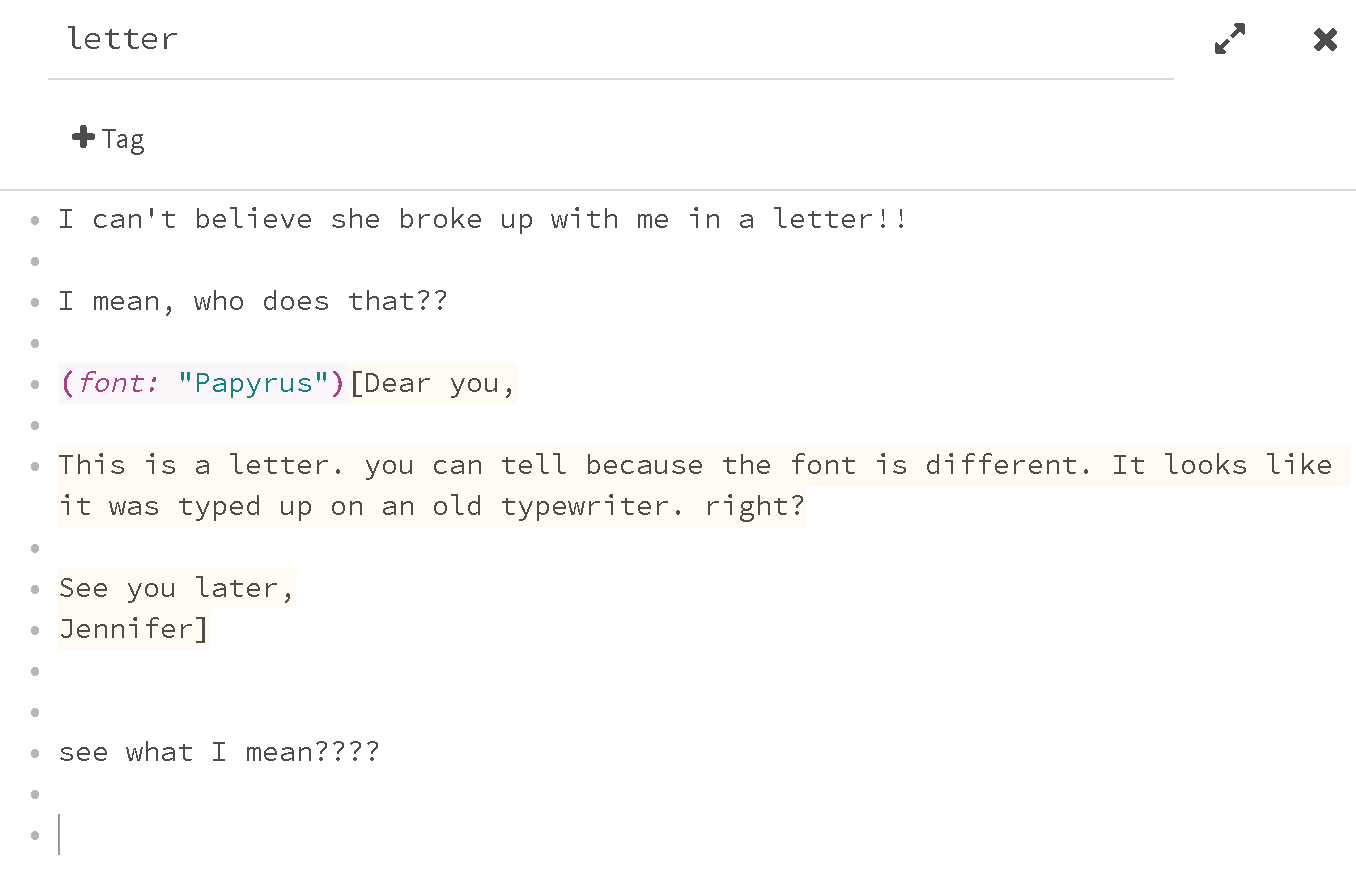
When designing narrative in twine you can change the font of by accessing a database of presaved fonts. First do an HTML search for a font you want to use, then add the command //(font:) then simply case sensitively type in the name of the font.
Try it in the Twine editor to see the magic yourself!

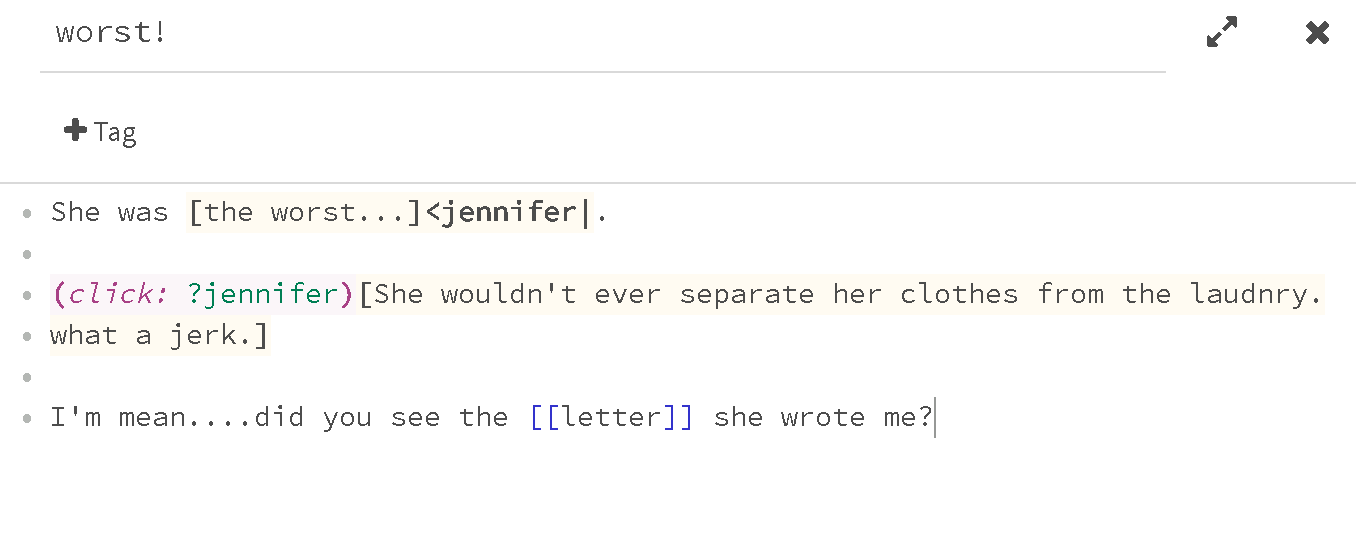
By adding the //(click:) command to ?jennifer, we are saying click on jennifer to reveal this text.
Then linking //letter to a new page!
Type the above directly into the twine editor to see the magic yourself!


Trigger Animator Instructions
← Here's the inspector Window of the TriggerAnimatorOnEnter script here:

The Anatomy of the Script
So in short words we need to have an animation file (one that we could probably swap later), set it up in the Animator Window by adding a State, Parameter, and Transition, and finally in the Scene window, a Behaviour.

Making an Animation
Making an Animation
I made a simple cube from Unity, gave it a scale of 1, 2, .1, and set it to zero. It's pretty important for animations that they are set to zero in Position. So that may require you to just give it a parent so the object is set to zero in relation to it.
While the object, in this case the cube, is selected, in the Animation tab (you can find it under Window>Animation>Animation if you don't see it) click Create in the center of the scrub window.

Making an Animation Continued
Once you name and save the .anim file anywhere you need, You now see what you need to edit the the movement. This can get really robust. This is very powerful, so for this, i'll keep it simple.
click Add Property
click the tiny right facing arrow next to Transform
click on the really really tiny + sign to the right of the transform type you want to animate (in our case - Rotate)

Door open Animation
Once you do, the rotation.x, .y, and .z show up in a little hierarchy to the right of the timeline. if you don't see it, hit the teeny weenie arrow to the left of the game object. Everything is so tiny...
You can just type in the parameters you want for your rotation. If you select a place on the timeline, a keyframe will just be added, you can select keyframes, or you can hit the 'record' icon (red dot) and rotate the object to any free form position in the scene.
I want to rotate the Y axis -90 degrees to open 'away' from us. You might notice it changing it in the inspector too. It's fine if it's highlighted in blue. It means it's being animated.

The Animator
Not to be confused with the Animation window, this window is completely different. It's a state machine. Like a visual hook up for transitions and parameters. This also is very powerful, and very robust. I highly recommend going down this rabbit hole if game animation is something you want to dive into. This system is also known as Mecanim in Unity speak.
When you go into the window after you have created an animation, it'll look like this with the Inspector Tab docked next to it (This will be relevant later):

Create a new State
Right click anywhere on the grid and you will see this. We want an Empty state.
This will create a node called New State. We can rename it, and we should. I'm going to call it "StartsClosed". You can do this in the Inspector tab if you have it selected. Just click where it says New State on the top and name it whatever you want.

Set up the Transitions - Grid
You can't do this until we have another state created. Now that we have, right click on your new state, ours is StartsClosed, click make transition, and drag it to DoorOpen.

Then...
right-click StartsClosed and select “set as Layer Default State”
See how the arrow from entry moved from DoorOpen to StartsClosed? That means StartsClosed is now the initial state of our state machine.

Setting up Parameters
Now we need to click on Parameters (the tiny tab next to layers) in the top Left part of the Animator tab, then the tiny plus sign to the right of the name field, then you'll see a drop down of some types of data. We want to select Trigger. Fun fact, a trigger is almost exactly the same as Bool, but has some additional logic attached to it. Just a Unity thing.
Now you'll want to give it a name. Remember the name, we are going to use it shortly. It is case sensitive, so for best practices, don't use spaces, numbers, or punctuation. Keep it simple. I'm calling the trigger "open".

Set up the Transition - Inspector
Click on the arrow between StartsClosed and DoorOpen in this example. This is called a state transition. Once you do it'll turn blue. and stuff shows up in the inspector. We are looking for the 'Conditions' box. It should say "List is Empty".

Click the tiny (+) sign. It will create a new condition and since we only have 1 parameter, it defaults to that one.

5. Setting up our Behaviour
Okay, lets head back over to your scene, and create the trigger. Add the TriggerAnimatorOnEnter script to your object you want as your Trigger. Make sure the object you are creating has had the "Is Trigger" box checked in the collider of the object.
Then make sure the Trigger field has the name of your parameter that you made. In our case, it needs to say "open", still case sensitive.
Make sure your character (or the object entering the trigger) has a rigid body component added to it.
I renamed the Original box that we animated to be called Door_Object. Since we have 2 cubes now. Then under the Animator field inside the "Trigger Animator On Enter (Script)" component make sure that says the name of the object you animated. The now named Door_Object.
Should all look like this:

Now if you test it, it should animate.
And you did it! You successfully set up the Animation Trigger!
Now, if you want to keep your animation from looping, just find the file in the project, and under the inspector tab and uncheck Loop Time. Should do the trick!
